5 DIY Indoor Seed Starting Hacks! Grow a Bountiful Garden Starting from Scratch!
Starting seeds indoors is an easy DIY setup that gives plants a head start before transplanting them outside.
- To create an indoor seed starting environment, use an empty egg carton, yogurt cups, or other household containers filled with seed starting mix.
- Punch drainage holes in the bottom of each vessel.
- Label your containers and plant 2-3 seeds in each according to packet instructions.
- Cover seeds gently with more mix.
- Place your seeded containers on a waterproof tray, cover with plastic, and put near a sunny window.
- Keep the mix moist but not soggy.
- Thin sprouted plants to 1 per container.
- Harden off young plants over 10-14 days by exposing them to more sun and outdoor conditions before transplanting into the garden around the last frost date.
With this simple DIY method, you can enjoy early harvests from healthy vegetable and flower seedlings.
Newspaper Pots

An easy DIY way to make small seedling pots for indoor seed starting is by recycling newspaper. Roll up sheets into a cylinder shape around a jar to form the pot and glue the end together using wheat paste or a simple paper mache technique.
You can also fold newspaper into a square origami pot and staple the corners. The biodegradable newspaper pots allow you to directly plant both pot and seedling into the garden later on. Simply wait until the outdoor soil has warmed sufficiently and the young plants are mature enough to thrive outside.
These newspaper seed pots provide an eco-friendly, free alternative to purchasing plastic seed trays or peat pots when raising seedlings indoors.
Paper Mache Planters
 Source: Link
Purchasing all the supplies needed for indoor seed starting can quickly add up.
Thankfully, gardeners have come up with creative DIY solutions for making homemade seed starters on a budget.
One such money-saving idea is to craft biodegradable seed pots out of paper mache using recycled cereal boxes or other cardboard packaging you likely already have around the house. By repurposing materials otherwise destined for the recycling bin, you can fashion the necessary vessels for nurturing your seeds into healthy seedlings ready for transplanting – all without having to buy plastic trays or disposable pots.
This eco-friendly upcycling approach allows you to slash costs while sticking to your sustainable living values. Follow a simple paper mache tutorial using leftover cardboard, flour, and water to whip up dozens of sturdy, custom seed pots for mere pennies apiece.
The end result is quality homegrown seedlings for your garden, more green staying in your wallet, and less waste thanks to upcycled plantable containers.
T.P. Pots

What do you do with all of your toilet paper rolls? Whether you are tossing them into the trash or the recycling bin, there is still a way that you can upcycle them.
Basically, you’ll save them to plant your seeds in. You just fill the rolls with potting mix and plant the seeds in them.
Then the seeds will grow, and when it is time to plant them in the ground, you can put the toilet paper roll and all in the ground. It will then compost and make the soil around the plant that much more vibrant.
So consider starting your seeds in your old toilet paper rolls this year and see what you think.
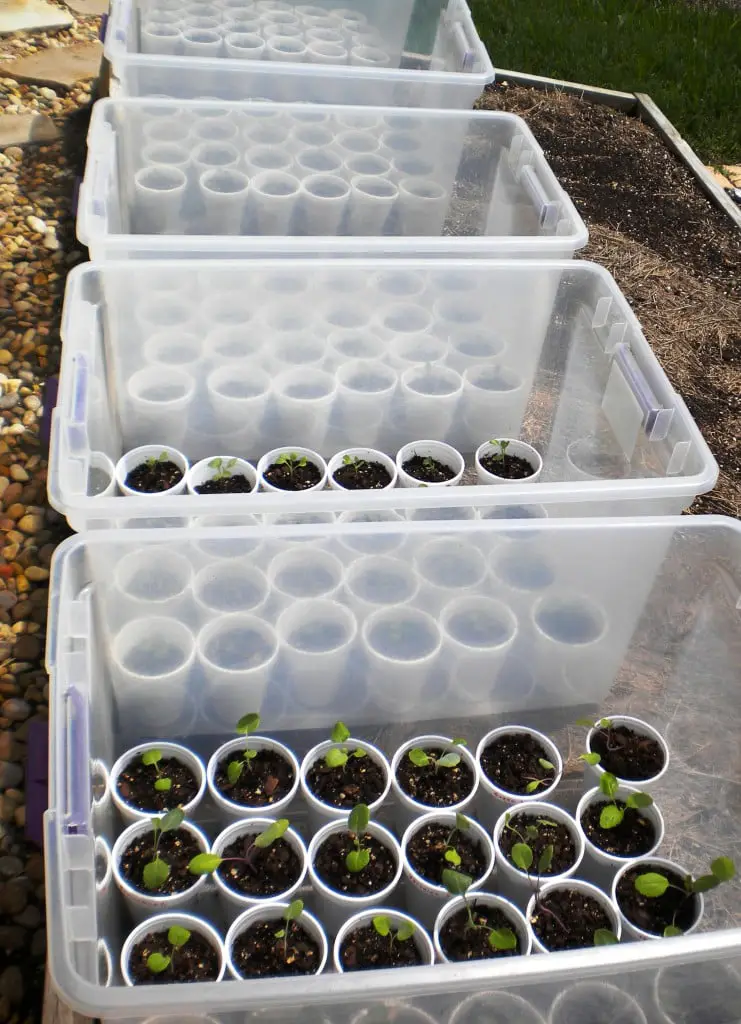
Portable Mini Greenhouse
 Source: Link
With no permanent greenhouse structure yet at my new home, I needed an adaptable seedling hardening solution. Typically I would nurture seeds to maturity indoors under grow lights before acclimating them in a protected greenhouse transition space outdoors pre-planting.
Lacking this setup currently, I discovered portable mini greenhouses as a convenient alternative for hardening off vegetable and flower seedlings.
The concept simply requires clear plastic storage totes, readily available for little cost. By moving seedlings from their indoor starting trays into these covered containers placed outside, they receive sunlight and adjust to outdoor conditions while still protected from harsh elements.
The lids allow me to control air flow and temperature as needed during the hardening process. Before transplanting the toughened young plants into the garden, I can easily transport the lightweight totes around the yard to give sprouts their best chance at survival post-germination. This affordable and reusable method keeps seedlings thriving until the permanent greenhouse build is complete.
Egg Carton Pots
 Source: Link
Egg cartons offer a readily available and affordable option for seed starting containers rather than buying plastic trays. Simply poke drainage holes in the bottom of an empty egg carton and fill the individual slots with seed starting mix. Sow seeds according to package directions, one per segment.
Cardboard egg cartons can be planted directly into garden beds along with the mature seedlings when it’s time to transplant since the material will break down naturally. For Styrofoam or plastic cartons that won’t decompose, gently remove seedlings to insert into the prepared garden soil instead.
As long as adequate drainage is provided, the compartments work similarly to cell packs for containing young vegetable or flower roots. So before tossing out your empty egg cartons, consider repurposing them to nurture seeds into healthy, productive garden plants while saving money and resources.
